Red Hat Enterprise Linux: RHEL3 / RHEL4
Enabling Telnet and FTP Services
Linux is configured to run the Telnet and FTP server, but by default, these services are not enabled. To enable the telnet service, login to the server as the root user account and run the following commands:
# chkconfig telnet on
# service xinetd reload
Reloading configuration: [ OK ]
Starting with the Red Hat Enterprise Linux 3.0 release (and in CentOS Enterprise Linux), the FTP server (wu-ftpd) is no longer available with xinetd. It has been replaced with vsftp and can be started from /etc/init.d/vsftpd as in the following:
# /etc/init.d/vsftpd start
Starting vsftpd for vsftpd: [ OK ]
If you want the vsftpd service to start and stop when recycling (rebooting) the machine, you can create the following symbolic links:
# ln -s /etc/init.d/vsftpd /etc/rc3.d/S56vsftpd
# ln -s /etc/init.d/vsftpd /etc/rc4.d/S56vsftpd
# ln -s /etc/init.d/vsftpd /etc/rc5.d/S56vsftpd
Allowing Root Logins to Telnet and FTP Services
Now before getting into the details of how to configure Red Hat Linux for root logins, keep in mind that this is VERY BAD security. Make sure that you NEVER configure your production servers for this type of login.
Configure Telnet for root logins
Simply edit the file /etc/securetty and add the following to the end of the file:
pts/0
pts/1
pts/2
pts/3
pts/4
pts/5
pts/6
pts/7
pts/8
pts/9
This will allow up to 10 telnet sessions to the server as root.
Configure FTP for root logins
Edit the files /etc/vsftpd.ftpusers and /etc/vsftpd.user_list and remove the 'root' line from each file.
Disable Root SSH Login on Linux
vi /etc/ssh/sshd_config
Find this section in the file, containing the line with "PermitRootLogin" in it.
#LoginGraceTime 2m
#PermitRootLogin no
#StrictModes yes
#MaxAuthTries 6
Make the line look like this to disable logging in through ssh as root.
PermitRootLogin no
Now you'll need to restart the sshd service:
/etc/init.d/sshd restart
Task: Disable / Turn off Linux Firewall (Red hat/CentOS/Fedora Core)
Type the following two commands (you must login as the root user):
# /etc/init.d/iptables save# /etc/init.d/iptables stop
Howto disable the iptables firewall in Linux
Task: Enable / Turn on Linux Firewall (Red hat/CentOS/Fedora Core)
Type the following command to turn on iptables firewall:
# /etc/init.d/iptables startOther Linux distribution
If you are using other Linux distribution such as Debian / Ubuntu / Suse Linux etc, try following generic procedure.
Save firewall rules
# iptables-save > /root/firewall.rules
OR
$ sudo iptables-save > /root/firewall.rulesNow type the following commands (login as root):
# iptables -X
# iptables -t nat -F
# iptables -t nat -X
# iptables -t mangle -F
# iptables -t mangle -X
# iptables -P INPUT ACCEPT
# iptables -P FORWARD ACCEPT
# iptables -P OUTPUT ACCEPT
To restore or turn on firewall type the following command:
# iptables-restore < /root/firewall.rulesGUI tools

VNCserver Configure on Linux
What is VNCserver?
VNC stands for Virtual Network Computing.
Why use VNCserver?
In Linux, everything can be done from a shell. However, there may be a time when you need to access the machine as if you were at the console.
Getting Started
You will need several things to get started:
root privledges
VNC client software (tightVNC)
A good password!
As I mentioned above, this example is done with RHEL, which comes standard with VNCserver installed. To start the vncserver simply invoke the following commands:
[root@eit etc]# service vncserver start
Starting VNC server: [ OK ]
[root@eit etc]#
[root@eit etc]# vncpasswd
Password:
Verify:
[root@eit etc]#
[root@eit etc]# vncserver
New 'eit:1 (root)' desktop is eit:1
Starting applications specified in /root/.vnc/xstartup
Log file is /root/.vnc/eit:1.log
[root@eit etc]#
[root@eit .vnc]# vi xstartup
Using vi (vim) to edit the xstartup file, make sure your file matches this one:
#!/bin/sh
# Uncomment the following two lines for normal desktop:
unset SESSION_MANAGER
exec /etc/X11/xinit/xinitrc
[ -x /etc/vnc/xstartup ] && exec /etc/vnc/xstartup
[ -r $HOME/.Xresources ] && xrdb $HOME/.Xresources
xsetroot -solid grey
vncconfig -iconic &
xterm -geometry 80x24+10+10 -ls -title "$VNCDESKTOP Desktop" &
twm &
OR
startx &
EBS-Demantra Integration Installation
EBS-Demantra Installation Overview
1. Install oracle 10g Software and Create Database
2. Install OracleAS 10.1.4 Infrastructure / Identity Management Instance
3. Install OracleAS 10.1.3 Application Server Middle Tier Instance
4. Install Demantra 7.1.1
5. Create and Deploy demantra.war file to OAS 10.1.3 Middle Tier
6. Upgrade EBS R12 to R12.0.4
7. Install EBS Demantra Integration Patch
Environment
1. Linux Server - EBS R12
2. Windows 2003 server - 10g DB, 10g AS(10.1.4) and Oracle SOA Suite 10g Release 3
3. Windows 2003 server - 10g client and Demantra Software 7.2
Upgrade R12 to 12.0.4
1 INSTALLING R12.AD.A.DELTA.4 FAILS FOR OFF-CYCLE PRODUCTS - 6767273
2 Use AutoPatch to apply R12.AD.A.DELTA.4 - 6510214
3 ORACLE E-BUSINESS SUITE 12.0.4 RELEASE UPDATE PACK - 6435000
4 Use AutoPatch to apply the latest consolidated online help patch - 6400100
POST PATCH
5 All customers must apply patch - 6742236
After Installing Demantra in windows 2003 server, Apply this patch on EBS.
6 Oracle Demantra Release 7.2.0 - 6617634
Linux EBIZ Server
EBS-DEMANTRA SALES AND OPERATIONS PLANNING and
DEMAND MANAGEMENT INTEGRATION FOR R12 - 6606568
10g Database Software Only
10201_database_win32
p4547817_10202_WINNT PATCH SET FOR ORACLE DB SERVER
Oracle Database 10g Enterprise Edition Release 10.2.0.2.0


 If TNSNAMES.ORA entry is not correct,the install will fail at this point.Tablespace for Demantra tables
Select standard Application

Select Demantra required tablespace


If you got java installed error, porceed your installation, Once Demantra installation done, then
download latest java and install again.
Java Version: j2sdk 1.4.2_18
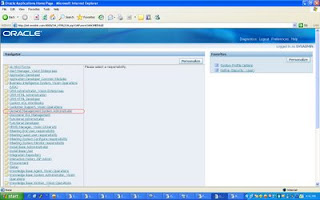
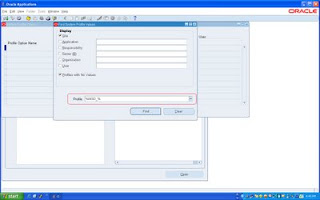
Please ensure to set the profile MSD_DEM:
Host URL on APS Suite Apps instance to value as noted above in the Your URL section MSD_DEM:
Host URL http://demantra.enrichit.net:8080/demantra
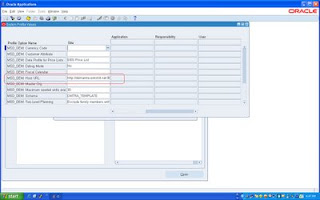
After register the MSD_DEM, bounce the apps server and start again.
Tehn login apps R12 and click the below respobsibility
Demand Management System Administrator.
here you click demantra url, this is automatically redirect to demantra.
1. Install oracle 10g Software and Create Database
2. Install OracleAS 10.1.4 Infrastructure / Identity Management Instance
3. Install OracleAS 10.1.3 Application Server Middle Tier Instance
4. Install Demantra 7.1.1
5. Create and Deploy demantra.war file to OAS 10.1.3 Middle Tier
6. Upgrade EBS R12 to R12.0.4
7. Install EBS Demantra Integration Patch
Environment
1. Linux Server - EBS R12
2. Windows 2003 server - 10g DB, 10g AS(10.1.4) and Oracle SOA Suite 10g Release 3
3. Windows 2003 server - 10g client and Demantra Software 7.2
Upgrade R12 to 12.0.4
1 INSTALLING R12.AD.A.DELTA.4 FAILS FOR OFF-CYCLE PRODUCTS - 6767273
2 Use AutoPatch to apply R12.AD.A.DELTA.4 - 6510214
3 ORACLE E-BUSINESS SUITE 12.0.4 RELEASE UPDATE PACK - 6435000
4 Use AutoPatch to apply the latest consolidated online help patch - 6400100
POST PATCH
5 All customers must apply patch - 6742236
After Installing Demantra in windows 2003 server, Apply this patch on EBS.
6 Oracle Demantra Release 7.2.0 - 6617634
Linux EBIZ Server
EBS-DEMANTRA SALES AND OPERATIONS PLANNING and
DEMAND MANAGEMENT INTEGRATION FOR R12 - 6606568
10g Database Software Only
10201_database_win32
p4547817_10202_WINNT PATCH SET FOR ORACLE DB SERVER
Oracle Database 10g Enterprise Edition Release 10.2.0.2.0
 10g Database Creation used to DBCA
Oracle Database 10g Enterprise Edition Release 10.2.0.2.0 - Prod
PL/SQL Release 10.2.0.2.0 - Production
CORE 10.2.0.2.0 Production
TNS for 32-bit Windows: Version 10.2.0.2.0 - Production
NLSRTL Version 10.2.0.2.0 - Production
 After Database create, please create the following tablespace.
 create tablespace TS_DP datafile 'E:\oradata\DMAN\ts_dp01.dbf' size 100M;
create tablespace TS_SALES_DATA datafile 'E:\oradata\DMAN\ts_sales_data01.dbf' size 100m;
create tablespace TS_SALES_DATA_X datafile 'E:\oradata\DMAN\ts_sales_data_x01.dbf' size 100m;
create tablespace TS_SIM datafile 'E:\oradata\DMAN\ts_sim01.dbf' size 100m;
create tablespace TS_SIM_X datafile 'E:\oradata\DMAN\ts_sim_x01.dbf' size 100m;
create tablespace TS_SALES_DATA_ENGINE datafile 'E:\oradata\DMAN\ts_sales_data_engine01.dbf' size 100m;
create tablespace TS_SALES_DATA_ENGINE_X datafile 'E:\oradata\DMAN\ts_sales_data_engine_x01.dbf' size 100m;
Install OracleAS 10.1.4 Infrastructure / Identity Management Instance


Default Selection

Select Automatic Port


The following J2EE Applications have been deployed and are accessible at the URLs listed below. Your database configuration files have been installed in
E: while other components selected for installation have been installed in
E:\OraHome_as.
Be cautious not to accidentally delete these configuration files.
Use the following URL to access the Oracle Enterprise Manager 10g Application Server Control Console : http://enricit.enrichdemantra.net:18100
The installation of Oracle Application Server 10g Release 3 (10.1.3.3.0) Patch Set 3 was successful.
These instructions are located in E:\product\10.1.3.1\OracleAS_1\install\readme.txt for your future reference.
You can view the status of the server with the following command:
E:\product\10.1.3.1\OracleAS_1\opmn\bin\opmnctl status -l
Application Server Control Console is running in this instance of Oracle Application Server. Installation Details: Installation Directory:
E:\product\10.1.3.1\OracleAS_1
Administrator Username: oc4jadmin
Documentation Online documentation for Oracle Application Server is available at: http://www.oracle.com/technology/documentation/appserver1013.html
Oracle Application Server 10.1.3.1.0 Installion


Upgrade iAS 101330


Copy Demantra database tnsnames.ora to 11i or R12 EBIZ, 10g AS infra database and 10g Database.
DEMANTRA =(DESCRIPTION =(ADDRESS = (PROTOCOL = TCP)(HOST = demantra.demantraserver.net)(PORT = 1531))(CONNECT_DATA =(SERVER = DEDICATED)(SERVICE_NAME = DEMANTRA)))
Then Install Demantrta on Windwos XP or 2003 Sever.
Install Demantra 7.2
On Windows 2000 / NT / XP / 2003(Standard not Business)
If Decentralized EBS/APS, Ensure to install the Demantra Database Schema into the APS Server.
A. Install Oracle 9i or 10g client as related to the EBS/APS Server Database version.
if EBS/APS server has 10g database,install 10g clientif EBS/APS server has 9i database,install 9i client
B. Parameters during install
Demantra Spectrum : On Windows
directory = C:\Demantra Spectrum
Choose Database Type:
Oracle
DBA User Name
SYSTEM
Password
oracle
TNS Name
DMAN
our APS Oracle 11i Applications Database SID/Instance Name
Specify the database user that will store Demantra data
Demantra Schema is installed against the APS Applications Instance Database in a decentralized environment.
User
dm
Demantra Schema name for EBS/APS = MSDEM or MSDM or MSDDM or DEMANTRA or DEMANTRA_TEMPLATE
Password
dm
JDBC Connection (to APS Applications 11i)
Host Machine (DNS or IP)
demantra.enrichit.net
Port Number
1531
Oracle SID
DMAN
If TNSNAMES.ORA entry is not correct,the install will fail at this point.Tablespace for Demantra tables
----Default Data tablespace ----
create tablespace TS_DP datafile 'D:\Dman_db\oracle\product\oradata\dman\ts_dp01.dbf' size 200M autoextend on maxsize 2000m;
----Default sales tablespace ----
create tablespace TS_SALES_DATA datafile 'D:\Dman_db\oracle\product\oradata\dman\ts_sales_data01.dbf' size 200m autoextend on maxsize 2000m;
-----Default Sales Index data tablespace------
create tablespace TS_SALES_DATA_X datafile 'D:\Dman_db\oracle\product\oradata\dman\ts_sales_data_x01.dbf' size 200m autoextend on maxsize 2000m;
-----Default tablespace simulation data------
create tablespace TS_SIM datafile 'D:\Dman_db\oracle\product\oradata\dman\ts_sim01.dbf' size 200m autoextend on maxsize 2000m;
-----Default tablespace for simulation data index-----
create tablespace TS_SIM_X datafile 'D:\Dman_db\oracle\product\oradata\dman\ts_sim_x01.dbf' size 200m autoextend on maxsize 2000m;
-----Default tablespace for sales data engine------
create tablespace TS_SALES_DATA_ENGINE datafile 'D:\Dman_db\oracle\product\oradata\dman\ts_sales_data_engine01.dbf' size 200m autoextend on maxsize 2000m;
-----Default tablespace for sales data engine indexes------
create tablespace TS_SALES_DATA_ENGINE_X datafile 'D:\Dman_db\oracle\product\oradata\dman\dmants_sales_data_engine_x01.dbf' size 200m autoextend on maxsize 2000m;
Oracle Demantra Release 7.2.0 - Patch 6617634


Select oracle 
Choose oracle database server or client( If you not using oracle client, Select Oracle Server.
I am using only oracle database server, so i select server.

DBA User Name : system
Password : xxxxxxxx
TNSNAME : SID NAME

Demantra Schema default User.
User name : dp
password : dp

Give you demantra hostname, oracle port number and Oracle SID. Then put you hostname to C:\WINDOWS\system32\drivers\etc\hosts
Eg. 192.168.100.100 demantra.demantraserver.net
 If TNSNAMES.ORA entry is not correct,the install will fail at this point.Tablespace for Demantra tables
Select standard Application

Select Demantra required tablespace


If you got java installed error, porceed your installation, Once Demantra installation done, then
download latest java and install again.
Java Version: j2sdk 1.4.2_18


Start Tomcat server
Go to below path and run create_war.bat.
C:\Program Files\Demantra Spectrum\Collaborator\demantra\create_war.bat
While you run create_war.bat, if you get any error please check your java_home.
Set the environmet to java_home. Then try to run again.
Specify Web Address
This is the web address to the OracleAS 10.1.3 Middle Tier
where the demantra.war file will be deployed
Root Address:
http://demantra.enrichit.net:80
Username: orcladmin
Password: Welcome1
Virtual Directory:
demantra Your URL:
http://demantra.enrichit.net:8080/demantra
Demantra Direct Login URL:
http://demantra.enrichit.net:8080/demantra/portal/loginpage.jsp


[Jun 30, 2008 9:03:27 PM] Application Deployer for demantra STARTS.
[Jun 30, 2008 9:03:27 PM] Copy the archive to E:\product\10.1.3.1\OracleAS_9\j2ee\home\applications\demantra.ear
[Jun 30, 2008 9:04:06 PM] Initialize E:\product\10.1.3.1\OracleAS_9\j2ee\home\applications\demantra.ear begins...
[Jun 30, 2008 9:04:06 PM] Unpacking demantra.ear
[Jun 30, 2008 9:05:13 PM] Done unpacking demantra.ear
[Jun 30, 2008 9:05:15 PM] Unpacking b2b.war
[Jun 30, 2008 9:07:12 PM] Done unpacking b2b.war
[Jun 30, 2008 9:07:12 PM] Initialize E:\product\10.1.3.1\OracleAS_9\j2ee\home\applications\demantra.ear ends...
[Jun 30, 2008 9:07:12 PM] Starting application : demantra
[Jun 30, 2008 9:07:12 PM] Initializing ClassLoader(s)
[Jun 30, 2008 9:07:12 PM] Initializing EJB container
[Jun 30, 2008 9:07:12 PM] Loading connector(s)
[Jun 30, 2008 9:07:13 PM] Starting up resource adapters
[Jun 30, 2008 9:07:13 PM] Initializing EJB sessions
[Jun 30, 2008 9:07:13 PM] Committing ClassLoader(s)
[Jun 30, 2008 9:07:13 PM] Initialize b2b begins...
[Jun 30, 2008 9:07:13 PM] Initialize b2b ends...
[Jun 30, 2008 9:07:13 PM] Started application : demantra
[Jun 30, 2008 9:07:13 PM] Binding web application(s) to site default-web-site begins...
[Jun 30, 2008 9:07:13 PM] Binding b2b web-module for application demantra to site default-web-site under context root Demantra
[Jun 30, 2008 9:07:16 PM] Initializing Servlet: com.demantra.common.servlets.LogInitializerServlet for web application b2b
[Jun 30, 2008 9:07:16 PM] Initializing Servlet: com.demantra.applicationServer.start.StarterServlet for web application b2b
[Jun 30, 2008 9:07:17 PM] Initializing Servlet: com.demantra.tunnel.server.TunnelServletContextInitializer for web application b2b
[Jun 30, 2008 9:07:17 PM] Initializing Servlet: com.demantra.tunnel.server.RequestDispatcherServlet for web application b2b
[Jun 30, 2008 9:07:17 PM] Initializing Servlet: com.demantra.portal.servlets.LoginServlet for web application b2b
[Jun 30, 2008 9:07:17 PM] Initializing Servlet: com.demantra.workflow.util.WorkflowServer for web application b2b
[Jun 30, 2008 9:07:17 PM] Initializing Servlet: com.demantra.schedule.servlets.ScheduleServlet for web application b2b
[Jun 30, 2008 9:07:17 PM] Binding web application(s) to site default-web-site ends...
[Jun 30, 2008 9:07:17 PM] Application Deployer for demantra COMPLETES. Operation time: 230219 msecs
After the Demantra Installation and EBS-Demantra Integration Patch
Linux EBIZ Server EBS-DEMANTRA SALES AND OPERATIONS PLANNING and DEMAND MANAGEMENT INTEGRATION FOR R12 - 6606568
After applying this patch login ebiz R12 and New demantra responsipility.

Please ensure to set the profile MSD_DEM:
Host URL on APS Suite Apps instance to value as noted above in the Your URL section MSD_DEM:
Host URL http://demantra.enrichit.net:8080/demantra


After register the MSD_DEM, bounce the apps server and start again.
Tehn login apps R12 and click the below respobsibility
Demand Management System Administrator.
here you click demantra url, this is automatically redirect to demantra.

Deamnra Username: dm/dm
 Direct Demantra Link
http://enricit.enrichdemantra.net:8080/demantra/portal/loginpage.jsp
DEMANTRA INSTALLATION DONE
If you need any further query, please post here.
Subscribe to:
Posts (Atom)

