PROBLEM
========
-- Problem Statement:Enterprise Manager 10g - Database Control monitoring a Infrastructure Database installed with Oracle Application Server shows the database instance in Pending Status
/11i/disco10g/infraas/10.1.0.3/zeus.fti-intra.com_blinfra/sysman/recv/errors
the above path, keep on errors generated
SOLUTION
=========
-- To implement the solution, please execute the following steps::
export ORACLE_HOME=/11i/disco10g/infraas/10.1.0.3
1. Stop the EM Console and DB Control:
$ORACLE_HOME/bin/emctl stop iasconsole$ORACLE_HOME/bin/emctl stop dbconsole
2. Take backup of $ORACLE_HOME/sysman/jlib/emCORE.jar file
cd $ORACLE_HOME/sysman/jlibcp emCORE.jar emCORE.jar.orig
3. Replace the $ORACLE_HOME/sysman/jlib/emCORE.jar file in the 10.1.4.0.1 home with a $ORACLE_HOME/sysman/jlib/emCORE.jar file from a standalone 10.1.0.5.0 database home file.
Download the file from: https://metalink2.oracle.com/cgi-bin/cr/getfile.cgi?p_attid=469050.1:1
4. Remove the log files from $OH/sysman/logs and $OH/sysman/recv/errors directories
5. Make a copy of $ORACLE_HOME/bin/emctl.pl
cd $ORACLE_HOME/bincp emctl.pl emctl.pl.orig
6. Edit $ORACLE_HOME/bin/emctl.pl and change references to 10.1.0.3.0 to 10.1.0.5.0; there are three places that the 10.1.0.3.0 reference must be changed to 10.1.0.5.0 as follows:
Metalink Note Id: 469050.1

Showing posts with label Application Server 10g(10g AS). Show all posts
Showing posts with label Application Server 10g(10g AS). Show all posts


eulapi -CONNECT EUL_US/EUL_US@upg -AUTO_UPGRADE
Database Error - ORA-02289: sequence does not exist
eulapi -CONNECT EUL_US/EUL_US@upg -AUTO_UPGRADE
-connect <**********>
-auto_upgrade
Database Error - ORA-02289: sequence does not exist
I recommend you to clean up the failed upgraded user because unnecessary object
s might remains.
Drop eul schema and import from your exported backup.
1) drop user eul_us cascade
2) Create eul_us again
3) Asign the access to eul_us (connect access, create table, etc)
4) Import the file you generated using imp command
imp EUL_US/EUL_US file=pre_10g_upgrade_eul_backup.dmp
Also, please consider the following:
Can you please make sure that EULowner in your new database has the following
privileges (before the import of the data from old database):
create procedure
create session
create table
create view
create sequence
grant create procedure, create session, create table, create view, create sequence to EUL_US;
Then run the -AUTPUPGRADE
bash-2.05b$ eulapi -CONNECT EUL_US/EUL_US@upg -AUTO_UPGRADE
-connect <**********>
-auto_upgrade
Command completed.
eulapi -CONNECT EUL_US/EUL_US@upg -AUTO_UPGRADE
-connect <**********>
-auto_upgrade
Database Error - ORA-02289: sequence does not exist
I recommend you to clean up the failed upgraded user because unnecessary object
s might remains.
Drop eul schema and import from your exported backup.
1) drop user eul_us cascade
2) Create eul_us again
3) Asign the access to eul_us (connect access, create table, etc)
4) Import the file you generated using imp command
imp EUL_US/EUL_US file=pre_10g_upgrade_eul_backup.dmp
Also, please consider the following:
Can you please make sure that EULowner in your new database has the following
privileges (before the import of the data from old database):
create procedure
create session
create table
create view
create sequence
grant create procedure, create session, create table, create view, create sequence to EUL_US;
Then run the -AUTPUPGRADE
bash-2.05b$ eulapi -CONNECT EUL_US/EUL_US@upg -AUTO_UPGRADE
-connect <**********>
-auto_upgrade
Command completed.
Discoverer 10g Installation and Migration Plan
Oracle Apps DBA: Discoverer 10g Installation and Migration Plan
http://www.oracle.com/technology/documentation/discoverer.html
http://www.oracle.com/technology/documentation/discoverer.html
How To Setup Web Services Integration with BI Publisher and Discoverer Doc ID: Note:459853.1
Changing the Net Listener Port in Oracle Applications Server 10g
Change port number 1521 to 1531 or anyone
Find the step by step that i performed to configure a new listener .
System Overview
10g Application server with infrastructure and middle tier installed on the same box.
Infrastructure Tier Services
OID
HTTP Server
Middle Tier Application
Portal
OS Users
Infrastructure OS user: oracle
Middle Tier OS user: oracle
Task
Current Listener running on port 1521.
Configuring a new listener on port 1531
Shutdown Services.
Shutdown all the infrastructure and middle tier services.
INFRA
$opmnctl stopall
$emctl stop iasconsole
MIDDLE TIER
$opmnctl stopall
$emctl stop iasconsole
Shutdown Your Infrastructure Listener
$lsnrctl stop
Change The Listener Configuration
Make the change to have the new post number in the lsitener.ora file on your infrastructure tier.
bash-2.05b$ more listener.ora
# listener.ora Network Configuration File: /u01/scr/disco10g/OraHome_10/network/admin/listener.ora
# Generated by Oracle configuration tools.
SID_LIST_LISTENER =
(SID_LIST =
(SID_DESC =
(SID_NAME = PLSExtProc)
(ORACLE_HOME = /u01/scr/disco10g/OraHome_10)
(PROGRAM = extproc)
)
)
LISTENER =
(DESCRIPTION_LIST =
(DESCRIPTION =
(ADDRESS_LIST =
(ADDRESS = (PROTOCOL = TCP)(HOST = apollo.doyen.com)(PORT = 1531))
)
(ADDRESS_LIST =
(ADDRESS = (PROTOCOL = IPC)(KEY = EXTPROC1531))
)
)
)
Change Your TNSNAMES
After this you need to make the change reflecting the new port in your TNSNAMES.ora file on both the infrastructure tier and the middle tier.
bash-2.05b$ cat tnsnames.ora
# tnsnames.ora Network Configuration File: /u01/scr/disco10g/OraHome_10/network/admin/tnsnames.ora
# Generated by Oracle configuration tools.
BLDISCO =
(DESCRIPTION =
(ADDRESS = (PROTOCOL = TCP)(HOST = apollo.doyen.com)(PORT = 1531))
(CONNECT_DATA =
(SERVER = DEDICATED)
(SERVICE_NAME = bldisco.doyen.com)
)
)
EXTPROC_CONNECTION_DATA =
(DESCRIPTION =
(ADDRESS_LIST =
(ADDRESS = (PROTOCOL = TCP)(HOST = apollo.doyen.com)(PORT = 1531))
)
(CONNECT_DATA =
(SERVICE_NAME = PLSExtProc)
)
)
Also replicate this change in middle tier tnsnames.ora.
Start Your Listener
Start your infrastructure tier listener.
$lsnrctl start bldisco
Set The New Listener At The Database Level.
You must execute this command in your infrastructure database to have the parameter local_listener set to your new listener.
$sqlplus "/ as sysdba"
SQL> alter system set local_listener='bldisco';
system altered
Bounce The Database.
Stop and startup your meta data repository database to have it register the new listener name.
Start Your OID On The Infrastructure Tier
$opmnctl startproc ias-component=OID
Change The Port Number In OID.
Start the Oracle Directory Manager from your desktop if you have the client installed else you can use the one on the server at $ORACLE_HOME/bin/oidadmin


Click add button and provide 10g infra hostname

Provide infra username and password
UserName : orcladmin
Password : xxxxxxxx


Click Entry Management –> cn=OraleContext ->bldisco(SID NAME) -> orclnetdescstring chnage the value of the new port here

Change The Other Config Files.
Based on your installation you may need to change the following files also
/u01/scr/disco10g/OraHome_10/sysman/emd/targets.xml
/u01/scr/disco10g/OraHome_10/Apache/modplsql/conf/dads.conf
Find the step by step that i performed to configure a new listener .
System Overview
10g Application server with infrastructure and middle tier installed on the same box.
Infrastructure Tier Services
OID
HTTP Server
Middle Tier Application
Portal
OS Users
Infrastructure OS user: oracle
Middle Tier OS user: oracle
Task
Current Listener running on port 1521.
Configuring a new listener on port 1531
Shutdown Services.
Shutdown all the infrastructure and middle tier services.
INFRA
$opmnctl stopall
$emctl stop iasconsole
MIDDLE TIER
$opmnctl stopall
$emctl stop iasconsole
Shutdown Your Infrastructure Listener
$lsnrctl stop
Change The Listener Configuration
Make the change to have the new post number in the lsitener.ora file on your infrastructure tier.
bash-2.05b$ more listener.ora
# listener.ora Network Configuration File: /u01/scr/disco10g/OraHome_10/network/admin/listener.ora
# Generated by Oracle configuration tools.
SID_LIST_LISTENER =
(SID_LIST =
(SID_DESC =
(SID_NAME = PLSExtProc)
(ORACLE_HOME = /u01/scr/disco10g/OraHome_10)
(PROGRAM = extproc)
)
)
LISTENER =
(DESCRIPTION_LIST =
(DESCRIPTION =
(ADDRESS_LIST =
(ADDRESS = (PROTOCOL = TCP)(HOST = apollo.doyen.com)(PORT = 1531))
)
(ADDRESS_LIST =
(ADDRESS = (PROTOCOL = IPC)(KEY = EXTPROC1531))
)
)
)
Change Your TNSNAMES
After this you need to make the change reflecting the new port in your TNSNAMES.ora file on both the infrastructure tier and the middle tier.
bash-2.05b$ cat tnsnames.ora
# tnsnames.ora Network Configuration File: /u01/scr/disco10g/OraHome_10/network/admin/tnsnames.ora
# Generated by Oracle configuration tools.
BLDISCO =
(DESCRIPTION =
(ADDRESS = (PROTOCOL = TCP)(HOST = apollo.doyen.com)(PORT = 1531))
(CONNECT_DATA =
(SERVER = DEDICATED)
(SERVICE_NAME = bldisco.doyen.com)
)
)
EXTPROC_CONNECTION_DATA =
(DESCRIPTION =
(ADDRESS_LIST =
(ADDRESS = (PROTOCOL = TCP)(HOST = apollo.doyen.com)(PORT = 1531))
)
(CONNECT_DATA =
(SERVICE_NAME = PLSExtProc)
)
)
Also replicate this change in middle tier tnsnames.ora.
Start Your Listener
Start your infrastructure tier listener.
$lsnrctl start bldisco
Set The New Listener At The Database Level.
You must execute this command in your infrastructure database to have the parameter local_listener set to your new listener.
$sqlplus "/ as sysdba"
SQL> alter system set local_listener='bldisco';
system altered
Bounce The Database.
Stop and startup your meta data repository database to have it register the new listener name.
Start Your OID On The Infrastructure Tier
$opmnctl startproc ias-component=OID
Change The Port Number In OID.
Start the Oracle Directory Manager from your desktop if you have the client installed else you can use the one on the server at $ORACLE_HOME/bin/oidadmin


Click add button and provide 10g infra hostname

Provide infra username and password
UserName : orcladmin
Password : xxxxxxxx


Click Entry Management –> cn=OraleContext ->bldisco(SID NAME) -> orclnetdescstring chnage the value of the new port here

Change The Other Config Files.
Based on your installation you may need to change the following files also
/u01/scr/disco10g/OraHome_10/sysman/emd/targets.xml
/u01/scr/disco10g/OraHome_10/Apache/modplsql/conf/dads.conf
Managing Your 10g Application Server
Managing the application server primarily the startup and shutdown procedures. I will discuss the opmn tool by Oracle and also the Enterprise Manager
The process described here also holds good for other Oracle products like Oracle Collaboration suite and Oracle SOA suite.
Any application server would necessarily consist of a infrastructure Tier, it may or may not have a middle tier associated.
Starting Application Server Services
Order of Startup
As the middle tier is dependent on your infrastructure it is important that the infrastructure should be up and running before you proceed with the middle tier services.
To start OracleAS Infrastructure:
1. If your OracleAS Infrastructure contains OracleAS Metadata Repository, start it as
follows:
a. Set the ORACLE_HOME environment variable to the OracleAS Infrastructure
Oracle home.
b. Set the ORACLE_SID environment variable to the OracleAS Metadata
Repository SID (default is orcl).
c. Start the Net Listener:
ORACLE_HOME/bin/lsnrctl start
d. Start the OracleAS Metadata Repository instance:
ORACLE_HOME/bin/sqlplus /nolog
SQL> connect SYS as SYSDBA
SQL> startup
SQL> quit
e. Start the Oracle Enterprise Manager 10g Database Control:
(UNIX)ORACLE_HOME/bin/emctl start dbconsole
(Windows)ORACLE_HOME\bin\emctl start idbconsole
Using runstartupconsole.sh
You can start up the infrastructure tier services using the runstartupconsole.sh script located at your $ORACLE_HOME/bin/ on the machine which contains your infrastructure.
$ cd $ORACLE_HOME/bin
$runstartupconsole.sh start
This command will startup
The AS Meta Data Repository Instance
The Listener
The Enterprise Manager Console
Infrastructure Process Such as OID,OC4J_security,SSO etc.
To startup the middle Tier Services you log in to your middle tier OS user and run the the runstartupconsole.sh from the middle tier ORACLE_HOME.
$ cd $ORACLE_HOME/bin
$runstartupconsole.sh start
This Command will start up
The 10g Enterprise Manager
All OPMN managed process for the middle tier like portal
Using Enterprise Manager Console
You can also use the 10g Enterprise Manager console to start up the infrastructure tier and middle tier services, however you must start up the enterprise manager explicitly before you can use it. The emctl command is used to startup the enterprise manager. The location is $ORACLE_HOME/bin
Start the Application Server Control Console:
(UNIX)ORACLE_HOME/bin/emctl start iasconsole
$emctl start iasconsole
Using OPMN
OPMN stands for the Oracle Process Manager and Notification, is a tool with you can manage the OPMN managed Infrastructure and Middle Tier Porcess. The opmnctl executable is located at the $ORACLE_HOME/opmn/bin.
opmnctl start
This command will start up your opmn process
opmnctl startall
This will start up the opmn process and all process managed by opmn
Start components:
(UNIX) ORACLE_HOME/opmn/bin/opmnctl startall
(Windows) ORACLE_HOME\opmn\bin\opmnctl startall
opmnctl startporc ias-component=component
This will start a specific opmn managed process like SSO
You can also start using the sub-porcess of a component using
opmnctl startproc process-type=process
You could also restart the processs using
opmnctl restartproc ias-component=component
opmnctl restartproc process-type=process
However before using OPMNCTL you must have started your Metadata Respositery Database Instance and the Listener manually.
Shutdown of Application Tier Services
Order Of Shutdown
Your Middle tier Services must be shutdown before you shutdown your infrastructure services.
Using runstartupconsole.sh
You can shutdown the infrastructure tier services using the runstartupconsole.sh script located at your $ORACLE_HOME/bin/ on the machine which contains your infrastructure.
$ cd $ORACLE_HOME/bin
$runstartupconsole.sh stop
This command will stop
All infrastructure tier services
The 10g EM console
The meta data repository instance
The listener
For middle Tier services you must run this command for the middle tier ORACLE_HOME.
Using Enterprise Manager Console
You can also use the 10g EM console to shutdown your middle tier and infrastructure services.
After that you must shutdown your EM console manually using the emctl command
emctl stop iasconsole
Stop the Application Server Control Console:
(UNIX)ORACLE_HOME/bin/emctl stop iasconsole
(Windows)ORACLE_HOME\bin\emctl stop iasconsole
You can also shutdown the Infrastructure services using the EM Console of the infrastructure tier after which you must manually shutdown the EM console manually using emctl at the infrastructure tier.
You must also remember to bring down your Meta Data Repository and Listener manually from the infrastructure home after all the services are brought down.
Using OPMN
Using opmnctl you can shutdown your middle tier services and infrastructure services.
opmnctl shutdown
This shutdown the opmn process and along with it all the managed opmn processes
opmnctl stopall
This command stops all opmn managed process for a particular tier.
Stop components:
(UNIX) ORACLE_HOME/opmn/bin/opmnctl stopall
(Windows) ORACLE_HOME\opmn\bin\opmnctl stopall
You can also stop a specify OPMN managed component using
opmnctl stopproc ias-component=component
or
opmnctl stopproc process-type=process
The EM console on the middle tier and the infrastructure tier needs to be brought down manually using emctl stop iasconsole.
Also the Meta Data Repository Instance and Listener need to be brought down manually.
If your OracleAS Infrastructure contains OracleAS Metadata Repository, stop it as
follows:
a. Set the ORACLE_HOME environment variable to the OracleAS Infrastructure
Oracle home.
b. Set the ORACLE_SID environment variable to the OracleAS Metadata
Repository SID (default is orcl).
c. Stop the OracleAS Metadata Repository instance:
ORACLE_HOME/bin/sqlplus /nolog
SQL> connect SYS as SYSDBA
SQL> shutdown
SQL> quit
d. Stop the Net Listener:
ORACLE_HOME/bin/lsnrctl stop
The process described here also holds good for other Oracle products like Oracle Collaboration suite and Oracle SOA suite.
Any application server would necessarily consist of a infrastructure Tier, it may or may not have a middle tier associated.
Starting Application Server Services
Order of Startup
As the middle tier is dependent on your infrastructure it is important that the infrastructure should be up and running before you proceed with the middle tier services.
To start OracleAS Infrastructure:
1. If your OracleAS Infrastructure contains OracleAS Metadata Repository, start it as
follows:
a. Set the ORACLE_HOME environment variable to the OracleAS Infrastructure
Oracle home.
b. Set the ORACLE_SID environment variable to the OracleAS Metadata
Repository SID (default is orcl).
c. Start the Net Listener:
ORACLE_HOME/bin/lsnrctl start
d. Start the OracleAS Metadata Repository instance:
ORACLE_HOME/bin/sqlplus /nolog
SQL> connect SYS as SYSDBA
SQL> startup
SQL> quit
e. Start the Oracle Enterprise Manager 10g Database Control:
(UNIX)ORACLE_HOME/bin/emctl start dbconsole
(Windows)ORACLE_HOME\bin\emctl start idbconsole
Using runstartupconsole.sh
You can start up the infrastructure tier services using the runstartupconsole.sh script located at your $ORACLE_HOME/bin/ on the machine which contains your infrastructure.
$ cd $ORACLE_HOME/bin
$runstartupconsole.sh start
This command will startup
The AS Meta Data Repository Instance
The Listener
The Enterprise Manager Console
Infrastructure Process Such as OID,OC4J_security,SSO etc.
To startup the middle Tier Services you log in to your middle tier OS user and run the the runstartupconsole.sh from the middle tier ORACLE_HOME.
$ cd $ORACLE_HOME/bin
$runstartupconsole.sh start
This Command will start up
The 10g Enterprise Manager
All OPMN managed process for the middle tier like portal
Using Enterprise Manager Console
You can also use the 10g Enterprise Manager console to start up the infrastructure tier and middle tier services, however you must start up the enterprise manager explicitly before you can use it. The emctl command is used to startup the enterprise manager. The location is $ORACLE_HOME/bin
Start the Application Server Control Console:
(UNIX)ORACLE_HOME/bin/emctl start iasconsole
$emctl start iasconsole
Using OPMN
OPMN stands for the Oracle Process Manager and Notification, is a tool with you can manage the OPMN managed Infrastructure and Middle Tier Porcess. The opmnctl executable is located at the $ORACLE_HOME/opmn/bin.
opmnctl start
This command will start up your opmn process
opmnctl startall
This will start up the opmn process and all process managed by opmn
Start components:
(UNIX) ORACLE_HOME/opmn/bin/opmnctl startall
(Windows) ORACLE_HOME\opmn\bin\opmnctl startall
opmnctl startporc ias-component=component
This will start a specific opmn managed process like SSO
You can also start using the sub-porcess of a component using
opmnctl startproc process-type=process
You could also restart the processs using
opmnctl restartproc ias-component=component
opmnctl restartproc process-type=process
However before using OPMNCTL you must have started your Metadata Respositery Database Instance and the Listener manually.
Shutdown of Application Tier Services
Order Of Shutdown
Your Middle tier Services must be shutdown before you shutdown your infrastructure services.
Using runstartupconsole.sh
You can shutdown the infrastructure tier services using the runstartupconsole.sh script located at your $ORACLE_HOME/bin/ on the machine which contains your infrastructure.
$ cd $ORACLE_HOME/bin
$runstartupconsole.sh stop
This command will stop
All infrastructure tier services
The 10g EM console
The meta data repository instance
The listener
For middle Tier services you must run this command for the middle tier ORACLE_HOME.
Using Enterprise Manager Console
You can also use the 10g EM console to shutdown your middle tier and infrastructure services.
After that you must shutdown your EM console manually using the emctl command
emctl stop iasconsole
Stop the Application Server Control Console:
(UNIX)ORACLE_HOME/bin/emctl stop iasconsole
(Windows)ORACLE_HOME\bin\emctl stop iasconsole
You can also shutdown the Infrastructure services using the EM Console of the infrastructure tier after which you must manually shutdown the EM console manually using emctl at the infrastructure tier.
You must also remember to bring down your Meta Data Repository and Listener manually from the infrastructure home after all the services are brought down.
Using OPMN
Using opmnctl you can shutdown your middle tier services and infrastructure services.
opmnctl shutdown
This shutdown the opmn process and along with it all the managed opmn processes
opmnctl stopall
This command stops all opmn managed process for a particular tier.
Stop components:
(UNIX) ORACLE_HOME/opmn/bin/opmnctl stopall
(Windows) ORACLE_HOME\opmn\bin\opmnctl stopall
You can also stop a specify OPMN managed component using
opmnctl stopproc ias-component=component
or
opmnctl stopproc process-type=process
The EM console on the middle tier and the infrastructure tier needs to be brought down manually using emctl stop iasconsole.
Also the Meta Data Repository Instance and Listener need to be brought down manually.
If your OracleAS Infrastructure contains OracleAS Metadata Repository, stop it as
follows:
a. Set the ORACLE_HOME environment variable to the OracleAS Infrastructure
Oracle home.
b. Set the ORACLE_SID environment variable to the OracleAS Metadata
Repository SID (default is orcl).
c. Stop the OracleAS Metadata Repository instance:
ORACLE_HOME/bin/sqlplus /nolog
SQL> connect SYS as SYSDBA
SQL> shutdown
SQL> quit
d. Stop the Net Listener:
ORACLE_HOME/bin/lsnrctl stop

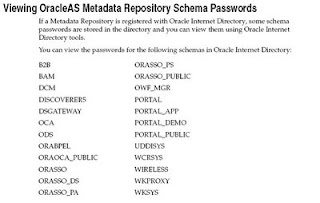
Changing Schema Passwords Using the Application Server Control Console
Oracle 10g AS default Password
do so, connect to the database as a user with SYSDBA privileges and issue the
following command:
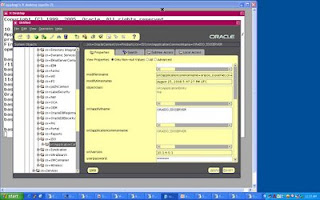
password in the Metadata Repository and in Oracle Internet Directory. Use the
following procedure to change these passwords:
■ On Windows, navigate to Oracle Directory Manager (Start, Programs, Oracle
Application Server Infrastructure - Oracle_Home, Integrated Management
Tools, Oracle Directory Manager)
2. Log in to Oracle Directory Manager as the orcladmin user.

3. In the System Objects frame, expand Entry Management, expand
cn=OracleContext, expand cn=Products, expand cn=IAS, expand cn=IAS
Infrastructure Databases, and expand orclReferenceName=dbname for the
Metadata Repository.


5. In the Properties tab, update the password in the orclpasswordattribute field.
 6. Click Apply.
How To Reset The SSO Application Entry Password Doc ID: Note:428134.1
SSO Change Password Will Fail if Number of Grace Logins is Set to One Doc ID: Note:278807.1
How To Change Passwords When OID Is Integrated with E-Business Suite Doc ID: Note:422731.1
Changing Single Sign-On(Orasso) schema Password Doc ID: Note:415753.1

Some schemas store their passwords in Oracle Internet Directory. You must change
their passwords using the Application Server Control Console so the password is
updated in both the database and Oracle Internet Directory.
1.0 To change a schema password using the Application Server Control Console:
1. Depending on the schema, navigate to the home page for the middle-tier instance
or the Infrastructure.
2. On the home page, click Infrastructure.
3. On the Infrastructure page, click Change Schema Password.
4. On the Change Schema Password page, select the schema. Enter the new
password in the Password and Confirm Password fields. Click OK.
1.1 Changing Schema Passwords Using SQL*Plus
do so, connect to the database as a user with SYSDBA privileges and issue the
following command:
SQL> ALTER USER schema IDENTIFIED BY new_password;
For example, to change the DCM schema password to abc123:
SQL> ALTER USER DCM IDENTIFIED BY abc123;
1.2 Changing Schema Passwords in Oracle Internet Directory
password in the Metadata Repository and in Oracle Internet Directory. Use the
following procedure to change these passwords:
1. Start Oracle Directory Manager:
■ On UNIX, use the following command:
ORACLE_HOME/bin/oidadmin

■ On Windows, navigate to Oracle Directory Manager (Start, Programs, Oracle
Application Server Infrastructure - Oracle_Home, Integrated Management
Tools, Oracle Directory Manager)
2. Log in to Oracle Directory Manager as the orcladmin user.

3. In the System Objects frame, expand Entry Management, expand
cn=OracleContext, expand cn=Products, expand cn=IAS, expand cn=IAS
Infrastructure Databases, and expand orclReferenceName=dbname for the
Metadata Repository.

4. Select the OrclResourceName=schema_name entry for the schema whose
password you want to change.

5. In the Properties tab, update the password in the orclpasswordattribute field.
 6. Click Apply.
How To Reset The SSO Application Entry Password Doc ID: Note:428134.1
SSO Change Password Will Fail if Number of Grace Logins is Set to One Doc ID: Note:278807.1
How To Change Passwords When OID Is Integrated with E-Business Suite Doc ID: Note:422731.1
Changing Single Sign-On(Orasso) schema Password Doc ID: Note:415753.1
Discoverer 10g Installation and Migration Plan
10g Infra and AS with Discoverer 10g Installation and Migration Plan
Software:
Application Server:
1. Oracle Identity Management 10g (10.1.4.0.1)
Download URL http://www.oracle.com/technology/software/products/ias/htdocs/101401.html
2. Oracle Application Server 10g Release 2 (10.1.2.0.2)
Download URL
http://www.oracle.com/technology/software/products/ias/htdocs/101202.html
What is Discoverer
http://www.epa.gov/ttn/airs/airsaqs/manuals/AQSDiscManDraftChapters1-3-29May07.pdf
Enivironment:
AIX Version 5.3 - EBIZ 11i
AIX Version 5.3 - Application Server(Separate Machine)

Index
• Feasible Architectures
• Installation
• Configuration
• Connectivity to Apps DB
• Post Installation Tasks
• EUL Migration
• Discoverer clients on Windows PC
• JInitiator upgradation
Steps
• Application Unix Account
• Oracle Unix account
• 10gAS Server Installation with Discoverer Component on separate ORACLE_HOME on existing 11i environment on application tier or separate server.
• Installation of Infra metadata database (If required) on separate server
• Configuration of Portal setup (If required)
Change ownership on application user like oracle or applmgr, etc …
chown -R applmgr:dba /etc/oraInventory
Configuration
1. Establish Connectivity between Discoverer 10g and Apps Database
2. Discoverer integration with 11i through changes in XML.
3. Discoverer Profile changes in 11i to point new Discoverer 10g
Connectivity to Apps DB
• Update tnsnames.ora file to connect Oracle Apps 11i
• Enable sqlnet access
• Connectivity check through Discoverer Home
Post Installation Tasks
• Configuring Oracle 11i to use Discoverer 10g and to load Application specific content and workbooks into discoverer 10g EUL
• Latest AutoConfig patch
• AD Patch application
• ICX Patch application
EUL Migration
• Schema creation for EUL
• EUL Creation
• Database Parameter setting (Rollback segment)
• DBA setup to migrate $AU_TOP to 10gAS server
• Import Discoverer Content for release 11i
• Refresh Discoverer 10g EUL
• Check grant privileges (Responsibility, Users, Workbooks )
Discoverer clients on Windows PC
Install Internet Developer Suit 10g, this will install Admin edition
• Edit Microsoft windows registry
• FTP DBC file from 11i to D:\secure on Windows PC
• TNS Connectivity to 11i Database
• Install Discoverer Desktop
JInitiator Upgradation
• Change in config.xml on 10gAS env.
• JVM setting for JInitiator 1.3.1.24
• JInitiator upgrade on 11i env.
• Application JInitiator patches
Oracle Application Server 10g 10.1.4.0.1
Installation Screenshots


The following information is available in:
/u01/applmgr/disco10g/OraHome_10/install/setupinfo.txt
Oracle Application Server 10g 10.1.4.0.1 Usernames and Default password information:
Please refer to Oracle Application Server 10g Administrator Guide for more information.
Install Type: Identity Management and Metadata Repository
Configured Components: Oracle Application Server Metadata Repository Oracle HTTP Server Oracle Application Server Containers for J2EE Oracle Internet D
irectory Oracle Application Server Single Sign-On Oracle Application Server Delegated Administration Services Oracle Directory Integration Platform
New Database created with these properties:
Database File Location: /u01/applmgr/disco10g/oradata/
Database Global Name: bldisco.doyen-sys.com
Database SID:bldisco
Database Name:bldisco
Character Set: -characterset AL32UTF8
Use the following URL to access the Oracle HTTP Server and the Welcome Page:
http://doyen.doyen-sys.com:7777
Use the following URL to access the Oracle Enterprise Manager Application Server Control:
http://doyen.doyen-sys.com:1156
Instance Name: infra.doyen.doyen-sys.com
Oracle Application server 10g 10.1.2.0.2


Give the OID(10g Infra hostname and OID Port) hostname and port.

Provide the 10g Infra username (ias_admin) password : welcome1


Provide the below details
User Name : ias_admin
Instance name : disco
Password : welcome1


Oracle Application Server 10g 10.1.2.0.2 Usernames and Default password information:
Please refer to the Oracle Application Server 10g Administrator Guide for more information.
Install Type: All Services
Configured Components: Oracle HTTP Server, Oracle Application Server 10g Containers for J2EE, Oracle Application Server 10g Web Cache, Oracle Application Ser
ver 10g Portal, Oracle Application Server 10g Discoverer, Oracle Application Server 10g Personalization, Oracle Application Server 10g Reports Services, Orac
le Application Server 10g Forms Services,
Registered with Oracle Internet Directory: apollo:389
Use only SSL connections with this Oracle Internet Directory:No
Database Connection String: doyen.doyen-sys:1521:bldisco.doyen-sys:bldisco.doyen-sys
Use the following URL to access the Oracle HTTP Server and the Welcome Page:
http://doyen.doyen-sys:7778/
Use the following URL to access the Oracle Enterprise Manager Application Server Control:
http://doyen.doyen-sys:1810/
Instance Name: disco.doyen.doyen-sys.com
END OF INSTALLATION
1.1 Copy dbc file from 11i ebiz to 10g Discoverer Server
Oracle E-Business Suite 11.5.10 customers :
The default naming convention for the .dbc file for Oracle E-Business Suite Release 11.5.10 is .dbc.
Please copy the dbc file.dbc from your 11i instance, and save the file on your Discoverer 10.1.2 $ORACLE_HOME/discoverer/secure directory as .dbc.
$copy $FND_SECURE(11i) TO $ORACLE_HOME/discoverer/secure(10g Disco)
$cp $FND_SECURE $ORACLE_HOME/discoverer/secure
1.2 Update tnsnames.ora file
Copy $TNS_ADMIN/tnsnames.ora (11i) to ORACLE_HOME/network/admin/tnsnames.ora(Disco 10g)
dev=
(DESCRIPTION=
(ADDRESS=(PROTOCOL=tcp)(HOST=apollo.fti-intra.com)(PORT=1535))
(CONNECT_DATA=
(SID=dev)
)
)
Software:
Application Server:
1. Oracle Identity Management 10g (10.1.4.0.1)
Download URL http://www.oracle.com/technology/software/products/ias/htdocs/101401.html
2. Oracle Application Server 10g Release 2 (10.1.2.0.2)
Download URL
http://www.oracle.com/technology/software/products/ias/htdocs/101202.html
What is Discoverer
http://www.epa.gov/ttn/airs/airsaqs/manuals/AQSDiscManDraftChapters1-3-29May07.pdf
Enivironment:
AIX Version 5.3 - EBIZ 11i
AIX Version 5.3 - Application Server(Separate Machine)

Index
• Feasible Architectures
• Installation
• Configuration
• Connectivity to Apps DB
• Post Installation Tasks
• EUL Migration
• Discoverer clients on Windows PC
• JInitiator upgradation
Steps
• Application Unix Account
• Oracle Unix account
• 10gAS Server Installation with Discoverer Component on separate ORACLE_HOME on existing 11i environment on application tier or separate server.
• Installation of Infra metadata database (If required) on separate server
• Configuration of Portal setup (If required)
Change ownership on application user like oracle or applmgr, etc …
chown -R applmgr:dba /etc/oraInventory
Configuration
1. Establish Connectivity between Discoverer 10g and Apps Database
2. Discoverer integration with 11i through changes in XML.
3. Discoverer Profile changes in 11i to point new Discoverer 10g
Connectivity to Apps DB
• Update tnsnames.ora file to connect Oracle Apps 11i
• Enable sqlnet access
• Connectivity check through Discoverer Home
Post Installation Tasks
• Configuring Oracle 11i to use Discoverer 10g and to load Application specific content and workbooks into discoverer 10g EUL
• Latest AutoConfig patch
• AD Patch application
• ICX Patch application
EUL Migration
• Schema creation for EUL
• EUL Creation
• Database Parameter setting (Rollback segment)
• DBA setup to migrate $AU_TOP to 10gAS server
• Import Discoverer Content for release 11i
• Refresh Discoverer 10g EUL
• Check grant privileges (Responsibility, Users, Workbooks )
Discoverer clients on Windows PC
Install Internet Developer Suit 10g, this will install Admin edition
• Edit Microsoft windows registry
• FTP DBC file from 11i to D:\secure on Windows PC
• TNS Connectivity to 11i Database
• Install Discoverer Desktop
JInitiator Upgradation
• Change in config.xml on 10gAS env.
• JVM setting for JInitiator 1.3.1.24
• JInitiator upgrade on 11i env.
• Application JInitiator patches
Oracle Application Server 10g 10.1.4.0.1
Installation Screenshots


The following information is available in:
/u01/applmgr/disco10g/OraHome_10/install/setupinfo.txt
Oracle Application Server 10g 10.1.4.0.1 Usernames and Default password information:
Please refer to Oracle Application Server 10g Administrator Guide for more information.
Install Type: Identity Management and Metadata Repository
Configured Components: Oracle Application Server Metadata Repository Oracle HTTP Server Oracle Application Server Containers for J2EE Oracle Internet D
irectory Oracle Application Server Single Sign-On Oracle Application Server Delegated Administration Services Oracle Directory Integration Platform
New Database created with these properties:
Database File Location: /u01/applmgr/disco10g/oradata/
Database Global Name: bldisco.doyen-sys.com
Database SID:bldisco
Database Name:bldisco
Character Set: -characterset AL32UTF8
Use the following URL to access the Oracle HTTP Server and the Welcome Page:
http://doyen.doyen-sys.com:7777
Use the following URL to access the Oracle Enterprise Manager Application Server Control:
http://doyen.doyen-sys.com:1156
Instance Name: infra.doyen.doyen-sys.com
Oracle Application server 10g 10.1.2.0.2


Give the OID(10g Infra hostname and OID Port) hostname and port.

Provide the 10g Infra username (ias_admin) password : welcome1


Provide the below details
User Name : ias_admin
Instance name : disco
Password : welcome1


Oracle Application Server 10g 10.1.2.0.2 Usernames and Default password information:
Please refer to the Oracle Application Server 10g Administrator Guide for more information.
Install Type: All Services
Configured Components: Oracle HTTP Server, Oracle Application Server 10g Containers for J2EE, Oracle Application Server 10g Web Cache, Oracle Application Ser
ver 10g Portal, Oracle Application Server 10g Discoverer, Oracle Application Server 10g Personalization, Oracle Application Server 10g Reports Services, Orac
le Application Server 10g Forms Services,
Registered with Oracle Internet Directory: apollo:389
Use only SSL connections with this Oracle Internet Directory:No
Database Connection String: doyen.doyen-sys:1521:bldisco.doyen-sys:bldisco.doyen-sys
Use the following URL to access the Oracle HTTP Server and the Welcome Page:
http://doyen.doyen-sys:7778/
Use the following URL to access the Oracle Enterprise Manager Application Server Control:
http://doyen.doyen-sys:1810/
Instance Name: disco.doyen.doyen-sys.com
END OF INSTALLATION
1.1 Copy dbc file from 11i ebiz to 10g Discoverer Server
Oracle E-Business Suite 11.5.10 customers :
The default naming convention for the .dbc file for Oracle E-Business Suite Release 11.5.10 is .dbc.
Please copy the dbc file
$copy $FND_SECURE(11i) TO $ORACLE_HOME/discoverer/secure(10g Disco)
$cp $FND_SECURE $ORACLE_HOME/discoverer/secure
1.2 Update tnsnames.ora file
Copy $TNS_ADMIN/tnsnames.ora (11i) to ORACLE_HOME/network/admin/tnsnames.ora(Disco 10g)
dev=
(DESCRIPTION=
(ADDRESS=(PROTOCOL=tcp)(HOST=apollo.fti-intra.com)(PORT=1535))
(CONNECT_DATA=
(SID=dev)
)
)


Migrate your existing Discoverer End User Layers to Discoverer 10.1.2.
Upgrade your existing Discoverer 4i or Discoverer 9.0.4 End User Layer to Discoverer 10.1.2 by using the following command on the standalone application server where Oracle Business Intelligence Server 10g Release 2
Pre Upgrade steps
1. export ORACLE_HOME=/progs/scr/disco10g/OraHome_11
2. export TNS_ADMIN=/progs/scr/disco10g/OraHome_11/network/ADMIN
3. tnsping uat
4. export eul_us schema in 11i instance(Just backup)
Backup 11i ebiz eul_us schema
oracle doyen> exp EUL_US/EUL_US file=pre_10g_upgrade_eul_backup.dmp
Run the following command to migrate 4i disco to 10g disco
10g Disco oracle home (not infra oracle home)
bash-2.05b$ pwd
/u01/applmgr/disco10g/OraHome_11/bin
bash-2.05b$ eulapi -CONNECT EUL_US/EUL_US@uat -AUTO_UPGRADE
-connect <**********>
-auto_upgrade
Command completed.
Now try to open Discoverer viewer


End Of the Installation
If need any query, please post your comments
Subscribe to:
Posts (Atom)

